#Create Own 3D Printing Slicer
Explore tagged Tumblr posts
Visit Tumblr Blog
Explore Tumblr blogs with no restrictions, modern design and the best experience.
Last Seen Tumblr Blogs


Fun Fact
1,644 Tumblr posts in 1 second.
Text
Why Mintcad Created Its Own 3D Printing Slicer?

3D printing has revolutionized the engineering industry as it reduces production time, increasing the opportunities for innovation. Your digitally created Computer Aided Designs turn into real, physical products with a 3D printer.
But do you know how your CAD software communicates with a 3D printer or how the files stored locally are sent to your 3D printer? Machines understand only the machine language and hence you need some coded instructions commanding the 3D printer to print your 3D printable models. You need an intermediate communicating tool which is a slicing software.
Slicing software gets the digital file from the CAD software and accordingly instructs the 3D printer on how to print the design to obtain the intended output. To better understand this, let’s picture you’re on a business trip to a foreign country but do not know their native language. This makes it difficult for you to communicate with the locals of that place and get your work done. So, you seek the help of a local person who understands both your language and the natively spoken one, thereby communicating your message to the people there and getting your work done. Slicing software is analogous to that intermediator who translates your message to the locals.
Let’s look over how a 3D printing Slicer works and how it’s a crucial asset to a 3D printing platform or a 3D printable NFT marketplace.
What is a Slicing Software?
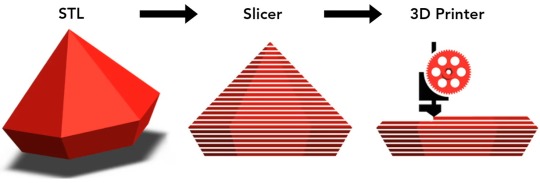
A slicing software is a crucial tool in the world of 3D printing. Technically speaking, the 3D printing slicer converts the STL file (Stereolithography or Standard Tessellation Language) into the G-code that commands the printer. It takes 3D printable models, formats like a .STL or .OBJ from a CAD software, and breaks it down into individual layers, much like slicing a loaf of bread.
These layers are then translated into vector instructions for the 3D printer, guiding it on how to build the object layer by layer. The software determines factors such as layer thickness, print speed, and support structures, ensuring that the final printed object matches the digital design. In essence, a slicer serves as the bridge between the digital design and the physical creation, making 3D printing possible.
There are many 3D printing slicing softwares available in the market including both free and paid versions. Cura, PrusaSlicer, Simplify3D and Slic3r are a few commonly used best 3D printer slicer softwares.
Mintcad comes integrated with our own homemade 3D printing slicer that makes it easy for people to slice the NFTs and make them print ready. Our proprietary slicing software Jullienne is free to use and is compatible with all types of 3D printers available in the market.

Parts of a Slicer Software
The slicing software has two major front end and back-end components i.e., the GUI and the logical algorithmic component respectively.
Front-End GUI
The Graphical User Interface component of the slicer is the one that helps the user to visualize the design and interact with the software. You can move, scale, rotate and change the settings for your 3D digital model.
Here you can view the complex 3D models into their layers.
Back-End Logic
The back end of the slicer converts the digital file and automatically generates the geometric code or the G-code which gives the necessary instruction to execute the print option.
Post the G-code generation, the slicing algorithm follows the geometric instructions and slices the 3D model into its 2D slices.
How Does Our 3D Printer Slicer Software - Jullienne Work?
You must first purchase a print from the many 3D printable NFTs that are listed on Mintcad. Learn how to buy a single print.
Once your purchased print is loaded onto our slicer the model is sliced into G-code layers that can be viewed in different anatomical directions - the coronal, axial, and sagittal planes.
Each slice is individually sent for the print operation.
Technically, the slicer converts the .STL file into a G-code that includes step by step instruction for the 3D printer on how to print.
The 3D printing is done in layers where each layer sits on another supporting layer below. However, if there are any hanging layers you can add an external supporting layer using the graphical elements like skirt, brim and raft.
You can add a single outline known as skirt surrounding the object on the print bed without actually touching the object.
A brim made of a few concentric layers gets attached to the edges of the 3D model and extend from the print bed. It keeps the print in place preventing warping while the printer works on the part.
A 3D printing support raft is a bit wider than the first layer of the print and placed beneath the object to print. It functions as the base support of the print.
All three graphical elements are easily detachable and hence the output print is an exact replica of the input file.
You can further set various print settings like the layer heights, infill percent, speed of printing, optimized print path, temperature of the extruder, filament diameter, nozzle diameter, print bed shape, etc.
Finally, you can connect it to your 3D printer and start printing.
Why Choose Mintcad’s Jullienne Slicer Software?
Mintcad is a holistic niche NFT marketplace where you can mint NFTs for your CAD files, sell your NFTs and also allow people to print it for a one-time fee. Printing an NFT or a digital 3D model requires connecting to a slicer software as an intermediary step. Instead of hunting for an external slicing software, you can get the work done on the Mintcad platform itself and for free of cost.
Here are a few reasons why Jullienne stands out as a good 3D printing slicing software:
i) Protecting Your Intellectual Property:
JULLIENNE ensures that your 3D NFT models don't need to be downloaded, allowing you to make money without sacrificing your intellectual property. This feature safeguards your creations and empowers you to profit while maintaining control over your digital assets.
ii) Supports 3D Printable NFTs:
Jullienne steps into the future by supporting 3D printable NFTs. Whether you've just acquired a Mintcad NFT or paid for a one-time print, load the file onto our slicer, and effortlessly send print commands remotely. Monitor your masterpiece in the making from anywhere.
iii) Customizable - Add Your Own Printer:
Tailor Jullienne to fit your 3D printing arsenal. While it's already prepped for most printer configurations, you have the power to add any custom printer to your toolkit, ensuring compatibility with your unique printing setup.
iv) Project Management - Never Lose Your Prints:
Bid farewell to the fear of losing print settings. Jullienne is your project vault, securely storing all your print data. Easily revisit settings, review past prints, and learn from each project, ensuring every print is a masterpiece.
v) G-code Playback - See Your Print in Action:
Witness your creation come to life with Jullienne's integrated layer playback. Visualize each layer's printing process, offering endless opportunities for optimization. See the magic unfold before your eyes, layer by layer.
vi) Access Anytime, Anywhere:
Embrace flexibility with Jullienne's browser-based app, granting you access to your files from any computer with just your login credentials. Your 3D printing projects are at your fingertips, anytime and anywhere.
vii) Real-Time Updates Without Additional Packages:
Stay informed with Jullienne's real-time updates, all without the hassle of installing extra packages. Receive notifications and insights as your prints progress, ensuring a smooth and informed 3D printing experience.
viii) Cross-Platform Compatible:
Experience Jullienne's versatility across browsers. Whether you prefer Chrome, Firefox, Safari, or Microsoft Edge, access your slicer effortlessly, breaking down platform barriers for a unified user experience.
ix) Free Of Cost
You do not need to burn a hole in your pocket to get your digital 3D model converted into a format that your 3D printer can print. You can easily and quickly do it via Mintcad’s proprietary Jullienne slicing software at free of cost.
x) User-Friendly UI/UX:
Experience an intuitive journey with Jullienne’s user-friendly interface. Navigating through your 3D printing projects becomes a breeze, making the entire process seamless and enjoyable for users of all levels.
Conclusion
A 3D printing slicer software serves as a great asset in getting your NFTs printed by converting the digital NFTs into printer understandable g-codes. Mintcad is a pioneer in integrating a proprietary slicing software into the NFT 3D printing platform making the entire process a breeze for the end users. Explore Mintcad’s slicing software Jullienne and print out some cool stuff today.
This content is originally published on Mintcad's Website: Why Mintcad Created Its Own 3D Printing Slicer?
0 notes
Text
This 3D printer can figure out how to print with an unknown material
New Post has been published on https://sunalei.org/news/this-3d-printer-can-figure-out-how-to-print-with-an-unknown-material/
This 3D printer can figure out how to print with an unknown material

While 3D printing has exploded in popularity, many of the plastic materials these printers use to create objects cannot be easily recycled. While new sustainable materials are emerging for use in 3D printing, they remain difficult to adopt because 3D printer settings need to be adjusted for each material, a process generally done by hand.
To print a new material from scratch, one must typically set up to 100 parameters in software that controls how the printer will extrude the material as it fabricates an object. Commonly used materials, like mass-manufactured polymers, have established sets of parameters that were perfected through tedious, trial-and-error processes.
But the properties of renewable and recyclable materials can fluctuate widely based on their composition, so fixed parameter sets are nearly impossible to create. In this case, users must come up with all these parameters by hand.
Researchers tackled this problem by developing a 3D printer that can automatically identify the parameters of an unknown material on its own.
A collaborative team from MIT’s Center for Bits and Atoms (CBA), the U.S. National Institute of Standards and Technology (NIST), and the National Center for Scientific Research in Greece (Demokritos) modified the extruder, the “heart” of a 3D printer, so it can measure the forces and flow of a material.
These data, gathered through a 20-minute test, are fed into a mathematical function that is used to automatically generate printing parameters. These parameters can be entered into off-the-shelf 3D printing software and used to print with a never-before-seen material.
The automatically generated parameters can replace about half of the parameters that typically must be tuned by hand. In a series of test prints with unique materials, including several renewable materials, the researchers showed that their method can consistently produce viable parameters.
This research could help to reduce the environmental impact of additive manufacturing, which typically relies on nonrecyclable polymers and resins derived from fossil fuels.
“In this paper, we demonstrate a method that can take all these interesting materials that are bio-based and made from various sustainable sources and show that the printer can figure out by itself how to print those materials. The goal is to make 3D printing more sustainable,” says senior author Neil Gershenfeld, who leads CBA.
His co-authors include first author Jake Read a graduate student in the CBA who led the printer development; Jonathan Seppala, a chemical engineer in the Materials Science and Engineering Division of NIST; Filippos Tourlomousis, a former CBA postdoc who now heads the Autonomous Science Lab at Demokritos; James Warren, who leads the Materials Genome Program at NIST; and Nicole Bakker, a research assistant at CBA. The research is published in the journal Integrating Materials and Manufacturing Innovation.
Shifting material properties
In fused filament fabrication (FFF), which is often used in rapid prototyping, molten polymers are extruded through a heated nozzle layer-by-layer to build a part. Software, called a slicer, provides instructions to the machine, but the slicer must be configured to work with a particular material.
Using renewable or recycled materials in an FFF 3D printer is especially challenging because there are so many variables that affect the material properties.
For instance, a bio-based polymer or resin might be composed of different mixes of plants based on the season. The properties of recycled materials also vary widely based on what is available to recycle.
“In ‘Back to the Future,’ there is a ‘Mr. Fusion’ blender where Doc just throws whatever he has into the blender and it works [as a power source for the DeLorean time machine]. That is the same idea here. Ideally, with plastics recycling, you could just shred what you have and print with it. But, with current feed-forward systems, that won’t work because if your filament changes significantly during the print, everything would break,” Read says.
To overcome these challenges, the researchers developed a 3D printer and workflow to automatically identify viable process parameters for any unknown material.
They started with a 3D printer their lab had previously developed that can capture data and provide feedback as it operates. The researchers added three instruments to the machine’s extruder that take measurements which are used to calculate parameters.
A load cell measures the pressure being exerted on the printing filament, while a feed rate sensor measures the thickness of the filament and the actual rate at which it is being fed through the printer.
“This fusion of measurement, modeling, and manufacturing is at the heart of the collaboration between NIST and CBA, as we work develop what we’ve termed ‘computational metrology,’” says Warren.
These measurements can be used to calculate the two most important, yet difficult to determine, printing parameters: flow rate and temperature. Nearly half of all print settings in standard software are related to these two parameters.
Deriving a dataset
Once they had the new instruments in place, the researchers developed a 20-minute test that generates a series of temperature and pressure readings at different flow rates. Essentially, the test involves setting the print nozzle at its hottest temperature, flowing the material through at a fixed rate, and then turning the heater off.
“It was really difficult to figure out how to make that test work. Trying to find the limits of the extruder means that you are going to break the extruder pretty often while you are testing it. The notion of turning the heater off and just passively taking measurements was the ‘aha’ moment,” says Read.
These data are entered into a function that automatically generates real parameters for the material and machine configuration, based on relative temperature and pressure inputs. The user can then enter those parameters into 3D printing software and generate instructions for the printer.
In experiments with six different materials, several of which were bio-based, the method automatically generated viable parameters that consistently led to successful prints of a complex object.
Moving forward, the researchers plan to integrate this process with 3D printing software so parameters don’t need to be entered manually. In addition, they want to enhance their workflow by incorporating a thermodynamic model of the hot end, which is the part of the printer that melts the filament.
This collaboration is now more broadly developing computational metrology, in which the output of a measurement is a predictive model rather than just a parameter. The researchers will be applying this in other areas of advanced manufacturing, as well as in expanding access to metrology.
“By developing a new method for the automatic generation of process parameters for fused filament fabrication, this study opens the door to the use of recycled and bio-based filaments that have variable and unknown behaviors. Importantly, this enhances the potential for digital manufacturing technology to utilize locally sourced sustainable materials,” says Alysia Garmulewicz, an associate professor in the Faculty of Administration and Economics at the University of Santiago in Chile who was not involved with this work.
This research is supported, in part, by the National Institute of Standards and Technology and the Center for Bits and Atoms Consortia.
0 notes
Text
This 3D printer can figure out how to print with an unknown material
New Post has been published on https://thedigitalinsider.com/this-3d-printer-can-figure-out-how-to-print-with-an-unknown-material/
This 3D printer can figure out how to print with an unknown material

While 3D printing has exploded in popularity, many of the plastic materials these printers use to create objects cannot be easily recycled. While new sustainable materials are emerging for use in 3D printing, they remain difficult to adopt because 3D printer settings need to be adjusted for each material, a process generally done by hand.
To print a new material from scratch, one must typically set up to 100 parameters in software that controls how the printer will extrude the material as it fabricates an object. Commonly used materials, like mass-manufactured polymers, have established sets of parameters that were perfected through tedious, trial-and-error processes.
But the properties of renewable and recyclable materials can fluctuate widely based on their composition, so fixed parameter sets are nearly impossible to create. In this case, users must come up with all these parameters by hand.
Researchers tackled this problem by developing a 3D printer that can automatically identify the parameters of an unknown material on its own.
A collaborative team from MIT’s Center for Bits and Atoms (CBA), the U.S. National Institute of Standards and Technology (NIST), and the National Center for Scientific Research in Greece (Demokritos) modified the extruder, the “heart” of a 3D printer, so it can measure the forces and flow of a material.
These data, gathered through a 20-minute test, are fed into a mathematical function that is used to automatically generate printing parameters. These parameters can be entered into off-the-shelf 3D printing software and used to print with a never-before-seen material.
The automatically generated parameters can replace about half of the parameters that typically must be tuned by hand. In a series of test prints with unique materials, including several renewable materials, the researchers showed that their method can consistently produce viable parameters.
This research could help to reduce the environmental impact of additive manufacturing, which typically relies on nonrecyclable polymers and resins derived from fossil fuels.
“In this paper, we demonstrate a method that can take all these interesting materials that are bio-based and made from various sustainable sources and show that the printer can figure out by itself how to print those materials. The goal is to make 3D printing more sustainable,” says senior author Neil Gershenfeld, who leads CBA.
His co-authors include first author Jake Read a graduate student in the CBA who led the printer development; Jonathan Seppala, a chemical engineer in the Materials Science and Engineering Division of NIST; Filippos Tourlomousis, a former CBA postdoc who now heads the Autonomous Science Lab at Demokritos; James Warren, who leads the Materials Genome Program at NIST; and Nicole Bakker, a research assistant at CBA. The research is published in the journal Integrating Materials and Manufacturing Innovation.
Shifting material properties
In fused filament fabrication (FFF), which is often used in rapid prototyping, molten polymers are extruded through a heated nozzle layer-by-layer to build a part. Software, called a slicer, provides instructions to the machine, but the slicer must be configured to work with a particular material.
Using renewable or recycled materials in an FFF 3D printer is especially challenging because there are so many variables that affect the material properties.
For instance, a bio-based polymer or resin might be composed of different mixes of plants based on the season. The properties of recycled materials also vary widely based on what is available to recycle.
“In ‘Back to the Future,’ there is a ‘Mr. Fusion’ blender where Doc just throws whatever he has into the blender and it works [as a power source for the DeLorean time machine]. That is the same idea here. Ideally, with plastics recycling, you could just shred what you have and print with it. But, with current feed-forward systems, that won’t work because if your filament changes significantly during the print, everything would break,” Read says.
To overcome these challenges, the researchers developed a 3D printer and workflow to automatically identify viable process parameters for any unknown material.
They started with a 3D printer their lab had previously developed that can capture data and provide feedback as it operates. The researchers added three instruments to the machine’s extruder that take measurements which are used to calculate parameters.
A load cell measures the pressure being exerted on the printing filament, while a feed rate sensor measures the thickness of the filament and the actual rate at which it is being fed through the printer.
“This fusion of measurement, modeling, and manufacturing is at the heart of the collaboration between NIST and CBA, as we work develop what we’ve termed ‘computational metrology,’” says Warren.
These measurements can be used to calculate the two most important, yet difficult to determine, printing parameters: flow rate and temperature. Nearly half of all print settings in standard software are related to these two parameters.
Deriving a dataset
Once they had the new instruments in place, the researchers developed a 20-minute test that generates a series of temperature and pressure readings at different flow rates. Essentially, the test involves setting the print nozzle at its hottest temperature, flowing the material through at a fixed rate, and then turning the heater off.
“It was really difficult to figure out how to make that test work. Trying to find the limits of the extruder means that you are going to break the extruder pretty often while you are testing it. The notion of turning the heater off and just passively taking measurements was the ‘aha’ moment,” says Read.
These data are entered into a function that automatically generates real parameters for the material and machine configuration, based on relative temperature and pressure inputs. The user can then enter those parameters into 3D printing software and generate instructions for the printer.
In experiments with six different materials, several of which were bio-based, the method automatically generated viable parameters that consistently led to successful prints of a complex object.
Moving forward, the researchers plan to integrate this process with 3D printing software so parameters don’t need to be entered manually. In addition, they want to enhance their workflow by incorporating a thermodynamic model of the hot end, which is the part of the printer that melts the filament.
This collaboration is now more broadly developing computational metrology, in which the output of a measurement is a predictive model rather than just a parameter. The researchers will be applying this in other areas of advanced manufacturing, as well as in expanding access to metrology.
“By developing a new method for the automatic generation of process parameters for fused filament fabrication, this study opens the door to the use of recycled and bio-based filaments that have variable and unknown behaviors. Importantly, this enhances the potential for digital manufacturing technology to utilize locally sourced sustainable materials,” says Alysia Garmulewicz, an associate professor in the Faculty of Administration and Economics at the University of Santiago in Chile who was not involved with this work.
This research is supported, in part, by the National Institute of Standards and Technology and the Center for Bits and Atoms Consortia.
#3-D printing#3d#3D printing#additive manufacturing#Administration#atoms#Capture#cell#Center for Bits and Atoms#chemical#Collaboration#collaborative#Composition#data#development#Economics#Engineer#engineering#Environmental#environmental impact#Fabrication#Faculty#fossil#Fossil fuels#fuels#Fusion#Future#genome#Greece#hand
0 notes
Text
How 3D Printing Can Boost Learning?
"Simply put, creation is an act of will." This Jurassic Park remark has never been more relevant than it is now, thanks to technology. The use of 3D printing and computer-aided design (CAD) in the classroom enables pupils to create like never before. A young industry, 3D printing has the ability to "print" everything from houses to cars to household products and much more.
Teachers may use this new technology to smoothly incorporate STEM into any classroom while also engaging students with their state standards in fresh and interesting ways. My students and I have grown to enjoy the 3D printer I got for my school because it improves lessons and fosters classroom community.
Community in the classroom and 3D printing
By providing incentives and fostering relationships with the students, my Prusa MINI 3D printer improves the classroom environment. After a class change, when I enter the room, I frequently notice children gazing intently at the 3D printer while it works. After finishing a unit of study in my social studies class, we play review games like Kahoot, Quizz, and Jeopardy. I 3D-printed Baby Yoda, the Ammit statue from Moon Knight, and different reptiles, for instance, for the Kahoot winners.
Almost anything with Dwayne Johnson's face is a student favourite. Dwayne Johnson's face has been affixed to various objects on the website Thingiverse, including a squirrel, a Tyrannosaurus rex (referred to as T-Rocks), a hawk, an octopus, etc. Despite how absurd it may appear, students adore it.
These 3D printed items can be given as rewards to every student, not only Kahoot contest winners. Students may receive a Dwayne Johnson face reward if they are behaving well, going through a difficult time, participating in class discussions when they ordinarily don't, or showing up on time.
With rewards in mind, 3D printing can strengthen relationships with pupils. For me to print, several students have used Thingiverse or produced their own 3D models. For instance, a student discovered a 3D skink item at her house, which also happened to be one of her pets. I printed the file for her after she sent it to me. She was thrilled when I gave her the skink because it was something incredibly easy for me to do. Another kid wanted to print a mallard, so he located the file, emailed it to me, and we all put it on the 3D printer together.
We have been publishing many anime-related items because many pupils are anime fans. The likelihood that my pupils will work harder in class increases if we can collaborate and interact positively.
IMPROVE LEARNING WITH 3D PRINTING
Beyond being entertaining, 3D printing has significant implications for boosting teaching and improve students' overall learning experiences. This covers both routine tasks and more substantial project-based learning (PBL) units. Students in my U.S. history class utilised Tinkercad to create a Monopoly piece to use when they play the board game as part of a subject on the Gilded Age.
The correct file type (.stl) was exported when students finished designing their 3D Monopoly component. Supports were then placed in a slicer tool that produced a g-code file, and the g-code file was then uploaded to the 3D printer. Support is added to assist prevent print jobs from failing. The moment the pupils held something they had created in their hands after printing, which can often take eight to ten hours, they were overjoyed.
PBLs can also be built using the technology of 3D printing. We've finished two PBLs in my class that involved 3D printing. In the first, students had to create a bridge that was as light as feasible while yet being able to support the required weight. The bridges were created by the students, printed, and tested using a small concrete weight. Following that, students returned to Tinkercad and continued to fiddle with their bridge in an effort to make it lighter and lighter.
The second PBL involves creating and printing a tool to assist an elderly person or a person with a disability. The task for the class was to design for a real individual. To continue brushing his own teeth despite having arthritis in his fingers, one student's granddad was given a toothbrush holder that fit around his wrist. Both of these PBLs used 3D printing to encourage students to think practically and with empathy.
I've discovered that 3D printing significantly improves the learning environment in the classroom, whether the objects are utilised as incentives or in courses to increase student engagement. According to my observations in social studies classes in high school, pupils really enjoy it. I would consider that a victory if it were the only thing they were anticipating that day.
And applications for 3D printing in high school classes are just getting started. Science, math, and culinary arts could all benefit in some way from 3D printing. Students' imaginations can be sparked and the process of creating can become more tangible thanks to 3D printing.
0 notes
Text
Ultimaker cura ender 3 v2 settings

The flexible print bed is almost perfect and I very rarely had to use adhesives like Magigoo to increase the adhesion. With the Ender 3 S1, you have very little to worry about in terms of print bed adhesion. Especially the settings for the retraction need a lot of calibration. In my experience, the profile from Creality Slicer is quite good, but far from perfect. If you can’t see all print settings, you have to activate the visibility in the settings. Then you transfer all data from the Machine Settings and transfer the values for the print settings. To create the new profile in Cura, you can either modify an Ender 3 profile or create an empty profile. However, you can get the best of both worlds by adding the profiles from Creality Slicer to Cura. In short, the main difference is that Creality Slicer often has better and readily available default profiles for Creality 3D printers, but lags behind Cura with the latest updates. If you are interested in the differences between the two slicers, you can take a look at this detailed comparison. Creality Slicer is based on Cura, looks almost identical and has the same settings. The Standard Profile from Creality Slicer as a BasisĬreality has its own variant of Cura, the Creality Slicer. Import the default profile from Creality Slicer and optimize it (best variant).Select the Ender 3 and adjust its settings (error-prone).Create a completely new profile (most complicated option).If you can’t find a standard profile for the Ender 3 S1, you have three options: However, Cura often does not have default profiles for new 3D printers several weeks or even months after release. These very important settings are described in this article and how you can calibrate them yourself. There are dozens of settings you can make in Cura to optimize your 3D printing, but a few of them are crucial. With this profile, you have very good default values that you can further optimize. Now scroll down to “Crealit圓D”, expand the dropdown menu and select the “Ender 3 S1”.Select “Add a non-networked printer” in the “Add” dialog.Click on “Settings” and then on “Printers” and “Manage printers”.You can find the default profiles under the settings for adding new 3D printers. They are an excellent starting point for further optimization. The Standard Profile from Cura as a BasisĬura offers excellent standard profiles for a lot of 3D printers. This way you can optimize the Cura profile of your Ender 3 S1. Therefore, after the best default settings, you will also find a section that explains the calibration of the most important parameters. Each nozzle, extruder and filament is slightly different and therefore requires different settings, even if they are close together. The values given in this article are good guidelines, but will not be perfect for your individual device. The fastest way to get a perfect Cura profile for the Ender 3 S1 is to use a pre-made standard profile.Īfter that, you only have to adjust it to your individual 3D printer and the used filament. The best settings in Cura for the Ender 3 S1 depend on the intended use of the object, the filament used and other parameters. Which Cura Settings are Best for the Ender 3 S1? 3 The Ender 3 S1 is Perfect for Beginners.2.1 Calibrating the Printing Temperature.2 Calibrating the Cura Settings for the Ender 3 S1.1.2 The Standard Profile from Creality Slicer as a Basis.1.1 The Standard Profile from Cura as a Basis.1 Which Cura Settings are Best for the Ender 3 S1?.
0 notes
Text
3d Printing Resources
Queadlunn- The two of us at here at OHI got a 3d printer a couple months ago now, a Creality CR-10 (BangGood, Amazon) and it’s been great for us so far! As we’ve been learning about 3d printing in general I’ve been gathering a list of sites and tools that we’ve been using. This isn’t a comprehensive list in any way, just stuff we’ve found so far.
Slicing Programs:
Cura (https://ultimaker.com/en/products/ultimaker-cura-software) - This is the slicing software we currently use. It’s free and has loads of options.
Slic3r (http://slic3r.org/) - Another slicer program, don’t know much about it though.
Simplify3d (https://www.simplify3d.com/) One of the paid programs, very well regarded.
Modeling programs:
Autodesk 123d Design (https://www.amazon.com//dp/B01HE5O9IM/) - No longer offered by Autodesk directly any more. A great model creating and editing tool.
Autodesk 3dStudioMax (https://www.autodesk.com/products/3ds-max/overview) - One of the industry standards for 3d modeling. It’s got a 30-day free trial and 3-year licensing for students.
Autodesk MeshMixer (https://www.meshmixer.com/) - Another Autodesk tool, this one specifically made for working with tri-mesh objects.
Blender (https://www.blender.org/) - Another standard, this time free. Blender seems to mostly be geared to animation and characters.
NifScope (http://niftools.sourceforge.net/wiki/NifSkope) - This is a tool used with Bethesda games, if you want to work with those.
Ninja Ripper (https://gamebanana.com/tools/5638) - This is a DIY tool to extract models from running 3d applications. All of the models it can see in the running application are dumped to a directory. It kinda works but needs a lot of messing with. Also requires 3dSMax to convert the models.
Sculptris (http://pixologic.com/sculptris/) - I haven’t used this one but it seems fairly well regarded.
Model sources:
Thingiverse (https://www.thingiverse.com/) - Free to use, ready to print models
MyMiniFactory (https://www.myminifactory.com/) - Free to use, ready to print models
TinkerCAD (https://www.tinkercad.com/) - Free to use, ready to print models. Also has a web-based model creator program.
Pinshape (https://pinshape.com/) - Both free and paid models, ready for your printing software.
CGTrader (https://www.cgtrader.com/) - Paid models, ready for your printing software
SketchFab (https://sketchfab.com/) - 3d model portfolio site, some models for download but they need to be converted for use with printing software (I’ve been using 3dSMax).
Shapeways (https://www.shapeways.com/) - Printing service, has their own catalog uploaded by artists. Can't download models. You can upload your own models to them to print but it can be expensive.
Yeggi (http://www.yeggi.com) - A search engine that covers many of the larger 3d model sties. It even covers some game model sites.
Common Troubleshooting Guides:
Simplify3d’s Print Quality Troubleshooting Guide: https://www.simplify3d.com/support/print-quality-troubleshooting/
All3dp - 34 Common 3D Printing Problems: https://all3dp.com/1/common-3d-printing-problems-troubleshooting-3d-printer-issues/
MatterHackers 3D Printer Troubleshooting Guide: https://www.matterhackers.com/articles/3d-printer-troubleshooting-guide
#3d printing#cosplay guide#Cosplay DIY#3d printing cosplay#Cosplay Help#OHI Cosplay#OHI Cosplay Tutorials#Queadlunn
129 notes
·
View notes
Photo

Easy-Print Modular Dungeons are now up on Thingiverse! As I usually do, I had a need, so I made it and printed it. These walls are designed to: *Print support free *Print without rafts *Look good in FDM *Look good when printed on a bare bones 3D printer. *Look good when printed at the lowest possible settings *Print fast *Minimize filament use Basically, you just slap these files into your slicer with bare bones minimal settings and go. An entire dungeon like this, with solid walls, would take 6+ weeks to print. I printed all of this in two weeks, and it only took me three hours to paint it all. Feel free to remix these and make your own versions, but please make them free for people to download too so we can grow a big database of easy-print, optimized assets. If you like these walls, please visit my miniatures store and buy yourself some miniatures. Your purchases inspire me and keep me creating cool free things! http://www.punkinfigs.com #3dprintedterrain #3dprint #3dprinting #3dp #3dprinted #paintedminiatures #wargaming #tabletopgames #boardgamesofinstagram #boardgames #dnd #dnd5e #tabletoproleplaying #28mm #28mmminiatures #28mmwargaming #warhammer #fantasy #undead #dungeon #dungeonsanddragons #fiveleagues #fantasy https://www.instagram.com/p/Ceu7KliOrOa/?igshid=NGJjMDIxMWI=
#3dprintedterrain#3dprint#3dprinting#3dp#3dprinted#paintedminiatures#wargaming#tabletopgames#boardgamesofinstagram#boardgames#dnd#dnd5e#tabletoproleplaying#28mm#28mmminiatures#28mmwargaming#warhammer#fantasy#undead#dungeon#dungeonsanddragons#fiveleagues
0 notes
Text
How To start A Business With 3D Printers
How To start A Business With 3D Printers

All you need is a special lithophane app to convert any digital photograph into an STL file. You may as well use Solidworks’ design validation instruments to verify that a print file can, the truth is, be printed. Thanks to a man named Kiril Lange, anybody with entry to a 3D printer can print out their own, already modeled airplane, and best of all, the design files are totally free. Design information for this? In a previous article we outlined the benefits of a business machine over a consumer printer; but the principle cause is if you employ SOLIDWORKS for professional design work then you definately need a proven professional-grade business 3D printer that goes to final and persistently print good results for you each time. I chose solidworks as a result of I used to be in a position to purchase it at an enormous discount. In case you are Army, a present student, or a trainer you'll be able to decide up solidworks for $150 per yr as in comparison with $14000 for the suite.

Earlier than printing, you can check the performance and safety of designed objects in Solidworks simulation modes to see if it is viable. 3D printing permits you to test out a design, make a custom part or object and customized gadgets. 3D printing technology is used in three broad utility areas: prototyping, tooling, and useful or finish half manufacturing. Open-supply slicer software. It gives a wide software aside from slicing. How does a Makerbot, a Formlabs, and a Shapeways print stand up towards being used within the target utility? Just get pleasure from being a kid”. 3D printing tools had followed an analogous trajectory, at first only being accessible and reasonable at large analysis institutions before know-how progressed in a method that reduced the dimensions, the associated fee, and the hurdles to access. 3D printing enthusiasts will appreciate the large print area - 331 cubic inches. He additionally suggests utilizing rafts when printing all the pieces, as this may better be certain that they print with the right surface texture and shape.
Hubs explains: “A low manufacturing run of product utilizing the SLS/MJF 3D printing course of would require five to 10 days of lead time. Once complete, the tail flaps will must be sanded down so that they'll rotate easily within their holes. As you slim down some profitable products, you possibly can start to broaden your merchandise and number of printers. Nearly. The arrival of pastime class 3D printers has put an entire new device into the hands of RC Modelers. Drone Builders that has some critical advantages over the old days of shopping for a balsa wooden package on the hobby shop. It is a nerdy interest that frees me up to by no means stop questioning, never stop exploring, and never cease playing. Of course, we must ultimately grow to be responsible adults, we must grow up, but that doesn’t mean we must cease rising. If you haven't used any modeling software up to now then you will have to spend some time getting acquainted with how the software program works. What Makes 3D Printing Software Good? Lange recommends printing the wings in ABS and filling the imperfections, which may alter the planes flight skill, with an ABS/acetone combine.
My biggest problem was that the planes took a very long time to build relative to the length of time I might fly one before crashing it. Not all of that was a function of improving my piloting expertise although-I realized how to construct these planes much more rapidly over time. Having lengthy sought ways to lower development costs and time, scale back waste, and construct extra quickly, 3D printing may assist deal with a number of points. I feel I finally acquired to a four or 5 to 1 ratio, which means I could successfully fly the airplane for about 5 instances extra hours than it took me to build it. You’ve acquired an unprecedented capability to create one off models or to add 3D printed parts to an current model to make it a greater or more unique scale mannequin. Personally, there's one thing about aviation, and the thought and creativity that goes into designing these mannequin aircraft, that awakens the kid in me. When I used to be a teenager, possibly thirteen or 14, and full of angst like most teenagers are, I distinctly remember moments where I assumed I knew how the world labored and demanded my dad and mom deal with me like an adult.
source https://creative-3d-simplification.blogspot.com/2022/06/how-to-start-business-with-3d-printers.html
0 notes
Text
An interactive pottery designer
I’ve been getting to grips with the Eazao 3D clay printer for the last couple of weeks and my first objects are due to be fired any day now. Exciting times.
All the pieces I’ve made have used Gcode generated from Fottery, an experimental HTML + JavaScript tool which generates continuous path Gcode for objects defined by mathematical functions.
Background
For printing in plastic, I have been using OpenSCAD to generate STL which is then converted by Slic3r into G-code. My work has mostly used OpenSCAD as a convenient functional programming language with minimal use of the CSG operations. This approach via STL can and is used for clay too and the Eazeo comes with configurations and advice for the Cura slicer.
For my clay objects I want to use mathematical functions to define the perimeter of the printed object, and its vertical profile. It would be possible to generate OpenSCAD code and this was done for another tool which generates 2.5D braided objects from functions. STL slicers can handle these shapes and in ‘vase’ mode, even generate a continuous spiralling filament path. But many interesting functions generate paths which self-intersect, and slicers aren’t very good at these.
Generating Gcode
So I wondered about generating Gcode directly from the mathematical function to make the object with a single, spiralling path. Having treated Gcode previously as assembler code not to be looked at, I now realise that G1 commands can correspond directly to steps in a straight-line approximated path. It turns out that generating Gcode directly wasn’t so hard after all, although in the Fottery tool I’ve been pretty conservative about the shapes it can make.
I tested the tool on PLA which was interesting in its own right, created objects which were surprisingly strong and flexible when constructed from a single continuous extruded thread. Printed in natural PLA, I think they would look great with some lights.

I had wondered if crossings would lead to increased thickess at that point. What appears to happen is that second pass thickens the crossing slightly but is thinned on the downstream side. This creates a slight weakness at this point but is otherwise not noticable.
Some results
These are a few examples drying on the wooden boards. Following Jonathan Keep’s advice, these are printed onto a handmade clay base - it’s difficult to print a waterproof base and Fottery can’t print bases anyway. When leather dry the bases were trimmed and excess clay reused (I love this aspect of clay printing)

(apologies for the poor photo)
These objects have been made with different functions and different ancillary tools:
Top-left and Middle-left are two vases constructed using a Heart equation, one of many such equations to represent a heart shape.
Top-right is constructed from points provided by an ancillary Fractal tool - the bottom is a Koch Square order 1, the top Koch Anti-square more familiar perhaps as Star and Cross tiling) with linear interpolation between corresponding points on the two curves - (the idea was too messy so it didnt make the cut)
Middle-right is a hypotrochoid with different parametric values defining top and bottom. Here interpolation uses linear interpolation between parameter values
Bottom row are based on curves derived from images via Inkscape to SVG then smoothed with a Fourier analysis tool: on the right is a fig leaf; on the left is a Savoy vase.
The tool
This is early days for this tool. The interface has grown more complicated as features have been added and I will be interested to see what others think. I’ve integrated the ancillary tools but they are in different stages of user-readiness
Code for Fottery is on Github
0 notes
Text
Lotmaxx SC-10 Shark Review: Reliable 3D Printer for Beginners, But Maybe Skip the Upgrades
Lotmaxx SC-10 Shark
9.00 / 10
Read Reviews
Read More Reviews
Read More Reviews
Read More Reviews
Read More Reviews
Read More Reviews
Read More Reviews
Read More Reviews
Read More Reviews
Read More Reviews
Read More Reviews
Read More Reviews
Read More Reviews
Read More Reviews
Read More Reviews
Read More Reviews
Read More Reviews
Read More Reviews


Shop Now
The Lotmaxx SC-10 Shark is an incredibly well-built and reliable printer out of the box, which makes it perfect for beginners. With easy to use features like a flexible heated build plate and handheld touchscreen, in my experience, there were zero tweaks required to get amazing prints. That's an incredible achievement for any printer, let alone one at this price point. I've tried a lot of 3D printers over the years, and almost none of them have "just worked". Full marks for the core package.
Specifications
Brand: Lotmaxx
Build Volume: 9.25x9.25x10.4 inches (235x235x265mm)
Printing Accuracy: 0.1-0.4mm
Connectivity: MicroSD, USB
Heated Build Plate: Yes, flexible and removable too
Feed Type: Bowden tube
Dimensions: 17x18.3x19.21 inches (443x466x488mm)
Weight: 18.5lbs (8.4kg)
Dual-Color Printing: Optional upgrade
Pros
Fantastic quality prints out of the box, no tweaking required
T-slot metal chassis is solid and well built
Detachable screen for convenience
Heated, removable, flexible print bed
Cons
Bi-color printing adds too much complexity, wastage, and failure rates for beginners
Auto-leveling upgrade is temperamental
Laser engraving prints line by line
Messy wiring once you add in any of the upgrade modules
Buy This Product
Lotmaxx SC-10 Shark other
Shop
// Bottom var galleryThumbs1 = new Swiper('.gallery-thumbs-1', { spaceBetween: 10, slidesPerView: 10, freeMode: true, watchSlidesVisibility: true, watchSlidesProgress: true, centerInsufficientSlides: true, allowTouchMove: false, preventClicks: false, breakpoints: { 1024: { slidesPerView: 6, } }, }); // Top var galleryTop1 = new Swiper('.gallery-top-1', { spaceBetween: 10, allowTouchMove: false, loop: true, preventClicks: false, breakpoints: { 1024: { allowTouchMove: true, } }, navigation: { nextEl: '.swiper-button-next', prevEl: '.swiper-button-prev', }, thumbs: { swiper: galleryThumbs1 } });
Easy to use, good quality prints, reasonably priced: pick any two when it comes to 3D printers.
At least, that used to be the case. The Lotmaxx SC-10 Shark doesn't compromise on build quality, yet it's also easy to use, works out of the box for reliable prints, and is very reasonably priced. It even has a selection of upgrades available, able to turn it into a dual-color extruder, or even a laser engraver.
youtube
Initial Impressions and Design
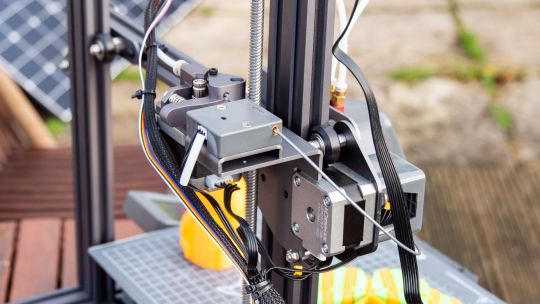
Arriving somewhat flat-packed, you'll need to spend a good half hour or so putting together the SC-10 Shark before first use. This isn't as bad as it sounds; it's certainly not what I'd call a DIY kit. Construction amounts to bolting on the upright gantry, as well as the spool holders, and screen. An extensive set of tools are provided, as well as a replacement Bowden tube, clippers, and scraper. Everything you could possibly need to get started printing is included, including some sample filament.
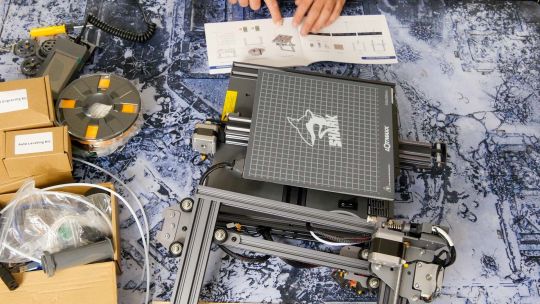
The component quality of the SC-10 is a class above most printers, with an all-metal T-slot chassis and injection molded plastic parts. It looks and feels premium, and solidly built. Whether that translates to good quality prints is another matter.
The core design is that of an Ender 3 clone, with a Bowden tube feeding the filament into the print head. A filament feed sensor ensures that running out of filament mid-print will pause and alert you to change it.
While the filament sensor is a useful touch, I admit I'm not a fan of the Bowden tube. The interface of the printer means that changing the filament requires pressing the same button about thirty times in order to move the filament 10mm at a time until it leaves the tube. A direct-drive extruder located directly on the print head is much easier, but this is a minor complaint.
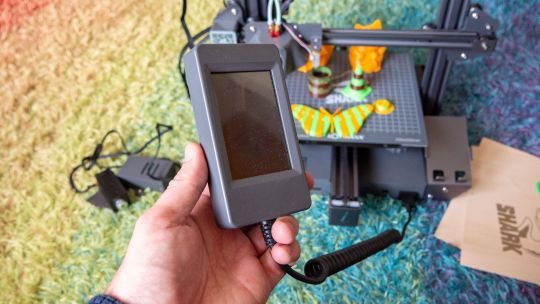
A large, removable full-color touchscreen can be found on the right-hand side, with a coiled cable which means you can manipulate the screen from anywhere within about a foot radius. Although this sounds like a small point of note in the hardware specs, I found it to be surprisingly useful, especially when you've got the printer perhaps pushed off to the back of your desk, or in a cabinet. The interface is a little slow, however, and could probably have simplified into a monochrome scheme to speed up processing.
You can transfer Gcode to the printer using a micro-SD card. Although USB printing is supported, it's not recommended from a PC, and I have yet to see any official support for Octoprint.
Particularly useful for beginners is the heated and removable flexible build plate. A heated build plate helps with first layer adhesion, which means fewer failed prints. Removing prints is effortless: just pull off the magnetically attached steel build plate, and bend it slightly to release the print. Scrape off any residue using the supplied scraper.
Lotmaxx SC-10 Shark: First Print
Before getting started with your first print, you'll need to manually level the print bed using four large dials located underneath. Select the leveling process from the settings menu, and place a sheet of paper on the print bed. Tap each leveling point in turn, and adjust the dial until you can start to feel some friction on the paper between the nozzle and the build plate. Repeat until it feels the same at all five points.
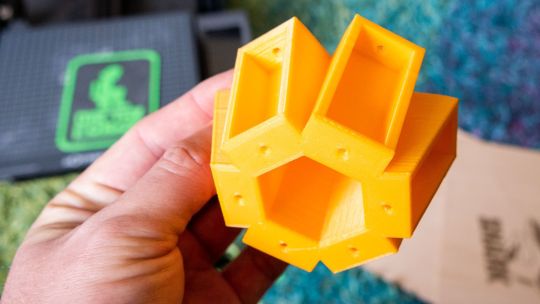
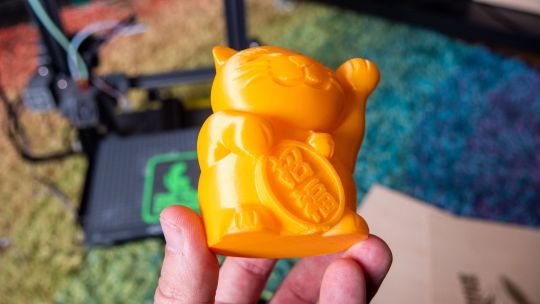
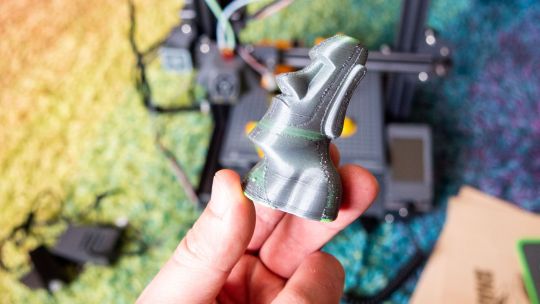
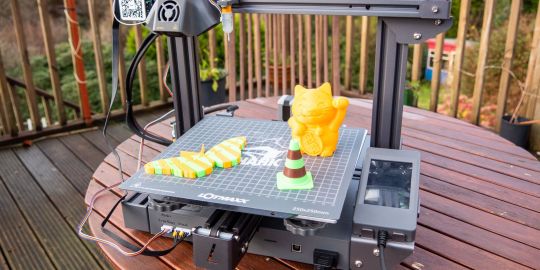
My first print was using the supplied test Gcode: a lucky cat. I'm pleased to report it worked the first time, with good adhesion and fast printing speed. While there is a slight issue with a drooping overhang under the right paw, it's still incredible quality for a first print, and these could easily be fixed by slowing it down.
What really surprised me was how incredibly quiet it was when printing. When idle, the fan noise is audible but easily ignored; but when printing starts, you could be in the same room and not actually know it's on. This is in sharp contrast to my aging Prusa Original mkII, which the entire house is aware of. The combination of solid metal frame, powerful stepper motors, and good quality stepper driver chips are what makes this possible. I would happily put the Lotmaxx SC-10 Shark in my office or bedroom while it prints.
Slicing Models
Lotmaxx provides custom software for slicing; it appears to be a modified version of Cura. Though I'm more familiar with Slicr, it feels easy enough for beginners and pros alike, displaying all the features I'd expect in an accessible way. There's a variety of quality presets, or you can delve into the individual parameters and create your own custom profiles. Slicing a downloaded STL file (for a 2V geodesic dome) was effortless, and again, produced a fantastic quality print with no failures. Printed at a slower speed than the lucky cat, there were no bridging issues at all.
There's no reason you can't use your own favorite slicing software, of course—the printer uses standard Gcode, and the settings can be taken from the device profile. But for beginners, I'd recommend just using the Lotmaxx software until you're more comfortable.
There's another reason to use the supplied software: if you purchased the laser engraving upgrade, the design software to produce laser Gcodes is integrated. Unlike 3D object slicers, I'm not aware of any third-party software that can handle this. Which brings us neatly onto the first upgrade available for the Lotmaxx SC-10 Shark.
Laser Engraving Module
The laser engraver is the easiest module to install, requiring only a few bolts to secure it to the right-hand side of the standard 3D print head. Once plugged in (to the front of the machine), the printer will automatically recognize it should switch over to Laser mode, without any firmware modifications or settings being changed. The interface adjusts accordingly, and you'll be able to select your laser Gcode for printing.
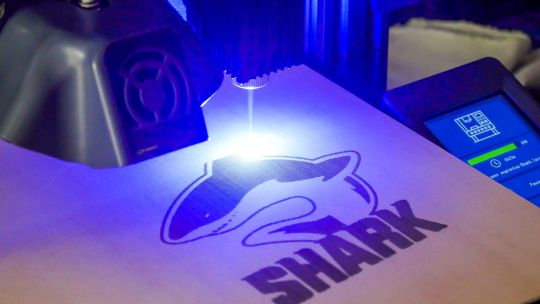
Use the clips provided to attach your print surface securely to the build plate. Since the engraver module is attached to the right of the print head, the actual area available to print on is less than the full build plate; roughly two-thirds the size, but this is still plenty big enough for most purposes. MAke sure you're wearing the provided safety goggles, then activate the laser and use a combination of the Z-axis and manually adjusting the focus dial on the laser module until the laser beam is focussed. Then you can start printing your design.
While it's generally safe to leave a 3D printer to its get on with its business thanks to thermal safety features, burning wood and other materials with a high-powered laser is another matter. Do not leave the machine unattended when printing in this mode.
Unfortunately, my results with the laser engraver were disappointing. Rather than treating outlines as a continuous movement then filling in the middle (as it would when 3D printing), the laser engraver prints line by line, like an inkjet. It looks quite terrible and ruins the utility of the module for me. The hardware is obviously capable of much better, so either I'm doing something completely wrong that isn't well explained in the manual, or it can be fixed with a software update.
Auto-Leveling
The second upgrade you can purchase with the SC-10 is the auto-leveler, a 3D Touch module. This is a small, physical probe that drops down, touches the print bed, then retracts. It's an inexpensive module, but in my experience, wasn't worth the hassle.
The auto-leveler attaches in much the same way as the laser engraver and also plugs in around the front of the machine. Unlike the laser module, you'll need to modify the firmware configuration file in order to make use of it, as well as change the Gcode start settings found in the slicing software.
Though I did manage to get one successful print having installed the auto-leveler, subsequent attempts sent the print head crashing into the bed. After much experimentation, I found the BLTouch seemingly requires the print bed to be manually leveled first, which somewhat defeats the purpose of an auto-leveling mechanism.
At this point, I was also frustrated with the lack of live Z-adjustment. Live Z-adjustment means that you can move the print head up and down even when the print process has started, so it's easy to back off or add a little more squish for the first layer, as needed. If you've manually leveled the bed anyway, this generally isn't needed, since it's already tuned to a paper thickness. But every time using the auto-leveler, I found I needed to tweak it slightly. Which again, involves the manual dials underneath the bed.
This is the first time I've used a 3D Touch probe, and I hope it's the last. The PINDA inductive probe method used by Prusa is more reliable and is able to adjust for all manner of warped beds without any manual intervention.
So despite being an inexpensive upgrade, I just wouldn't bother with the auto-leveler. Out of the box, manual leveling works just fine.
Bi-Color Printing with a Dual Extruder
The final upgrade you can purchase for the SC-10 Shark is the most complex to install, and most impressive—if you can get it working right.
Printing in multiple filaments takes the creative possibilities of a 3D printer to a whole other level. As well as multiple colors, you can print more complex objects thanks to water-soluble support structures.
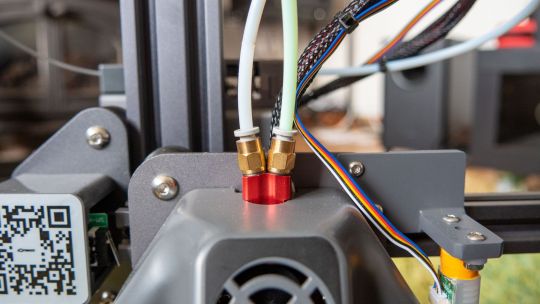
The dual-extruder upgrade on the Lotmaxx SC-10 involves completely disassembling the print head and replacing the hotend. You'll then have two Bowden tubes to deal with. You'll also need to fit a second extruder motor, sensor, and filament holder onto the gantry, and remove the base of the printer to install a driver chip. And there'll be more cables to route, which again, plug in at the front of the machine. It took me at least an hour, and I'm fairly certain I broke the single-color hotend in the process, thanks to an uncooperative Bowden tube clip.
When you're finished, it's a little messy, if I'm honest. While I can deal with a dangling cable for the temporary use of a laser engraver, once you add in an auto-leveler and second extruder, the neatly wrapped cabling and overall aesthetics of the printer are ruined.
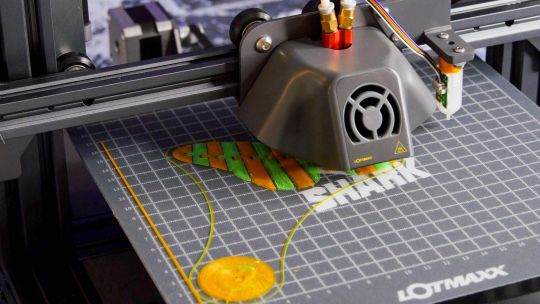
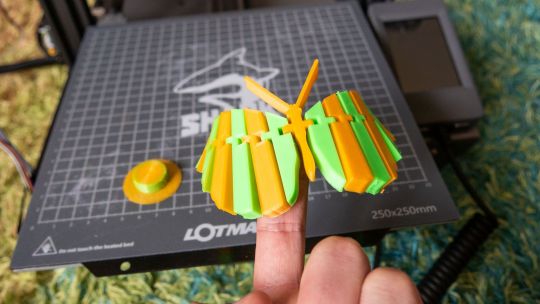
After again altering the firmware configuration file and printer profile settings, the test print turned out great. It's a beautiful two-color cone, it really is. But one thing you should know about bi-color printing from a single print head is that getting defined colors like that requires cleaning the hotend at each color change. The print head moves off to the side, squirts a bit out into a column of waste, then carries on. To produce that one lovely test cone required an equally large column of waste.
Perhaps this is a non-issue if you're printing an entire plate full of beautifully bi-color cones. Wider, flatter models produce comparatively less waste, for sure. But I have to ask if it's worth it. You can turn off the column of cleaning waste if you want, but the results are terrible; you can see below how the bi-color effect is ruined, and you'll get "bobbling" where it tries to change colors anyway.
Unlike some printers, the Sc-10 Shark can't mix colors. Attempting to push the other filament in at the same time doesn't work, and you'll hear the extruders clicking as the filament jams. This means that before each print you'll need to ensure both filaments are retracted about 1cm into the Bowden tube. This isn't an automatic process, so you have raise the hotend temperature first, then retract each extruders. It's even trickier with lighter colors filaments as the tube is opaque white, so you may need to use a smartphone flashlight to shine through the tube.
You should also know that designing a two-color print requires two models. You'll need to load both models in, hope they align, assign each to the respective print head, then merge them. There are comparatively few ready-made bi-color models available in this format for you to download.
Although the results are impressive, the additional wasted plastic, slicer complications, and inability to color mix filaments inside the hotend mean that you need significantly higher levels of patience to get good results. Once I swapped over to the dual-color system, my failure rate skyrocketed.
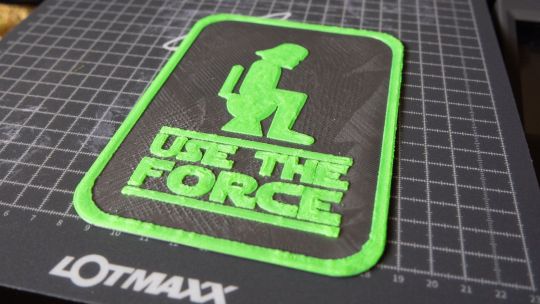
I should also note that it's still possible to print in two colors even without a second extruder if the color change occurs at a specific layer. This enables you to print things like signage by just sending a pause signal at a certain layer, and swapping the filament over.
Aside: the print above was terrible quality (though it didn't fail, as such), with pillowing on the first layer and what seems like over-extrusion throughout. I'm still trying to isolate why.
Lotmaxx SC-10 Shark: Great for Beginners
Let me be clear: the Lotmaxx SC-10 Shark is an incredibly well-built and reliable printer out of the box, which makes it perfect for beginners. With easy to use features like a flexible heated build plate and handheld touchscreen, in my experience, there were zero tweaks required to get amazing prints. That's an incredible achievement for any printer, let alone one at this price point. I've tried a lot of 3D printers over the years, and almost none of them have "just worked". Full marks for the core package.
But once I got to the optional upgrades, I ran into increased failures and disappointing results.
The auto-leveler is unreliable and still needs manual adjustment. Manual leveling really isn't that hard anyway, so I ended up just disabling the 3D Touch module.
The dual-extruder adds too much complexity for the beginner and decreases the overall reliability of the prints; I wouldn't recommend installing it and ruining what is otherwise a great printer. If you're a pro user who must have the ability to print with dual-extruders, I'd recommend a printer that's designed for it from the outset, rather than an optional upgrade.
The laser engraver is the most promising upgrade that requires the least effort to install. While I haven't had great best results with it yet, I'm confident it can be improved. If you can buy one upgrade only, it should be the laser module.
Then again: at around $400 for the complete package, it might be worth a punt anyway. Software updates might improve the performance of the upgrades, or you might be confident enough later down the line to install them without fearing the inevitable tweaks.
Lotmaxx SC-10 Shark Review: Reliable 3D Printer for Beginners, But Maybe Skip the Upgrades published first on http://droneseco.tumblr.com/
0 notes
Text
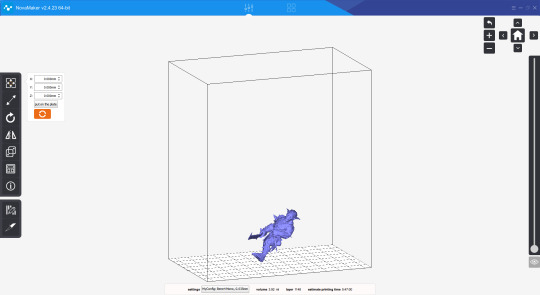
Nova3d Bene4 Mono: A Stunning Resin Printer Let Down by Proprietary Software
Nova3D Bene4 Mono
8.00 / 10
Read Reviews
Read More Reviews
Read More Reviews
Read More Reviews
Read More Reviews
Read More Reviews
Read More Reviews
Read More Reviews
Read More Reviews


Shop Now
The large build area and super quick build times make the Nova Bene4 Mono a fantastic printer at a budget price. Unfortunately, the Novamaker software falls behind other options.
Specifications
Brand : Nova3D
XY Resolution: 2560 x 1620
Build area: 5.1 x 2.8 x 5.9 inches
Layer Thickness: 25 to 100 microns
Printer Size: 15 x 11.8 x 19.3 inches
Pros
Capable of incredibly detailed models
Faster than many other printers in its class
Some nice quality of life features
Cons
Proprietary slicing filetype and lackluster software
Buy This Product
Nova3D Bene4 Mono other
Shop
<![CDATA[ // Bottom var galleryThumbs1 = new Swiper('.gallery-thumbs-1', { spaceBetween: 10, slidesPerView: 10, freeMode: true, watchSlidesVisibility: true, watchSlidesProgress: true, centerInsufficientSlides: true, allowTouchMove: false, preventClicks: false, breakpoints: { 1024: { slidesPerView: 6, } }, }); // Top var galleryTop1 = new Swiper('.gallery-top-1', { spaceBetween: 10, allowTouchMove: false, loop: true, preventClicks: false, breakpoints: { 1024: { allowTouchMove: true, } }, navigation: { nextEl: '.swiper-button-next', prevEl: '.swiper-button-prev', }, thumbs: { swiper: galleryThumbs1 } }); ]]>
The Nova3D Bene4 Mono is a budget resin printer offering fast print times and incredible quality thanks to its 2K monochrome LCD screen. There are some nice quality of life touches included in the design, and the printer is as easy to use as resin-based printers can be.
youtube
Bene4 Mono: A Familiar Design?
At first glance, the Bene4 Mono looks like every other desktop-sized resin printer. The solid metal base contains a touch screen for operation. Above, you find the LCD screen, metal resin vat, and z-axis with build plate; the constituent parts for all MSLA printers of this type.

Look a little closer, however, and you'll notice several nice features. The UV hood, designed to stop unwanted light from getting to the resin, is fitted on a strong hinge. This means that you don't have to lift the whole top off to interact with the printer.
The build plate has four adjustment screws attached to it. You'll need these when leveling the plate, and the four screw design is a lot less hassle than the usual two screws/ball joint combination you'll find on similar printers.

Finally, the resin tray has four small feet attached to the bottom. These help you guide the resin tray into the correct position for printing, but they have an even more useful function.

When you need to clean out old resin, especially after a failed print, you don't have to worry about damaging the clear PEP filter on the underside of the resin tray. The feet elevate it enough to keep it free of any dust or grime on your work surface.
It's clear that this printer has had a fair bit of thought put into it, but how well does it print?
Beautiful Prints at Fast Speeds
The full-color guide that comes with the Nova3d Bene4 Mono takes you through everything you need to perform your first prints with the machine. The model I reviewed came with the build plate already level, so all that was left was to pour in some resin and start a test print.

The printer comes with a USB drive containing two pre-sliced test prints. Both show off just how impressive the print quality is on the Bene4 Mono. The octopus prints as one piece, though each linked tentacle comes loose after printing. The Nova3D logo has a lot of intricate geometry to support while printing, along with some wafer this intricacy within the globes.
The "Mono" in the name relates to the monochrome LCD screen that provides the UV light mask. Monochrome screens allow for faster printing by allowing through more of the UV light compared to older color LCD screens and have a longer lifetime. While this is a big improvement over the previous generation of printers, it's becoming increasingly commonplace.
The quality is clearly there, and while there are 4k printers at this price range, there's nothing low quality about these prints.
Connecting to the Bene4 Mono
The Bene4 Mono comes with a 4.3 inch "smart" touchscreen, which is easy to navigate and worked without any hitches. Alongside manual movement options, you can use the menus to trigger prints stored on a USB drive, or in the printer's local 8GB memory.

You'll also use this menu to connect the printer to your network. Once connected to Wi-Fi, I didn't find myself using the screen all that often, though the screen showing the leftover time for a print and a graphical representation of the layer currently being printed was a handy reference during prints.
Everything You Need to Get Started?
Resin printing requires careful preparation. Appropriate safety gear is essential, and there are a few tools you'll need for post-processing. Nova3d provides some basic tools and accessories, including a few pairs of high-quality nitrile gloves, but you'll want to get a few more things ready before starting your first print.

Alongside resin for printing, you need isopropyl alcohol for washing finished prints. The pump-action spray bottle they provide is cute but not all that useful. Realistically you need a box large enough to fit any finished model into and enough isopropyl alcohol to submerge it fully for cleaning.

The plastic scraper they provide is perfect for cleaning the FEP filter without damaging it, but you may want to get a thin metal blade for getting stuck prints off the build plate. You'll need a lot more gloves than they give you and a pair of safety goggles to protect your eyes when you inevitably splash yourself with a mixture of resin and almost pure alcohol.

Finally, you'll need a way to cure your prints. Resin doesn't fully harden until it's been cured under UV lights for several hours. If you live in a sunny place, then you can leave them in direct sunlight. If you don't, you'll need to either buy a UV curing station or make your own. Even homemade and far from perfect setups can work, but your mileage may vary.
Nova3D does provide a spare FEP film, which is a nice touch as the FEP film at the bottom of the tank requires cleaning between each resin change. Failed prints will also end up stuck to it, and when it gets damaged, you must replace it. Thankfully, this is an easy task using the provided Allen key.

Regardless of which model you choose, resin printing is not for the faint-hearted. If you are a complete beginner to 3d printing or share your space with children, a more traditional FDM printer might be a better place to start.
Are There Any Downsides to the Bene4 Mono?
In terms of the hands-on experience, the Bene4 Mono is as easy to use as resin printers get. The only design flaw is the USB drive position, which is round the back next to the barrel jack and ethernet port. If you use it a lot, I can imagine this getting annoying, but after the test prints, I sent every print to it over the local network and never used it again, so it wasn't an issue.
Everything about the printer itself seems well thought out, and I was excited to spin up some slicing software and print some more tests. Unfortunately, this is where the issues start.
Novamaker: The Only Software for the Bene4 Mono
Almost all resin printers use Chitubox as the software for supporting and slicing models before printing. It's been updated many times over the years, and there is a strong community behind it, providing tutorials and tips on YouTube and in the forums.
Nova3d provide their own software called Novamaker. While it does the job, it's nowhere near as powerful as Chitubox and is missing some key features. You cannot hollow models using Novamaker, and there are fewer options for adding print support structures.
Novamaker has received some significant updates in recent months, and while there is an unofficial plugin for Chitubox, which adds support for the .cws slicer files the printer takes, it's prone to breaking and wasn't functional to test during this review.
The options for printing were to use pre-hollowed and supported models, print solid models (a massive waste of resin), or do all preparation work in another piece of software and import the .stl file into Novamaker for printing.
This is a small workaround, but it's not one any other printer in this class makes you do.
If you have a well-supported model, you'll get incredible quality prints with little fuss. This charming doggo from MyMiniFactory user Spare Oom Studios, among several others, came out looking stunning:
Unfortunately, if you import a raw model and expect the Novamaker software to prepare it for printing, there's little way of telling if the print will succeed.
The in-software features for controlling the printer and sending prints over the network all worked flawlessly. It's just a shame that they didn't leave it at that and use the same software as everyone else.
Should You Buy the Nova3d Bene4 Mono
This is undoubtedly a fantastic printer, and from a hands-on user perspective, I can't fault it. It creates beautiful prints quickly and has a number of quality of life features that put it above other printers at this price range.
For $299, you're not going to find a printer that blends as many nice features as this one, and in the future, I'd recommend this printer to anyone interested in resin printing. For now, I'd wait until the Novamaker software improves or they add stable support for Chitubox before buying.
You can buy the Nova3d Bene4 Mono direct from Nova3d for $299.
Nova3d Bene4 Mono: A Stunning Resin Printer Let Down by Proprietary Software posted first on grassroutespage.blogspot.com
0 notes
Text
Support Education With A 3D Printer Donation

If you would like to foster the next generation of critical thinkers, problem solvers, innovators, and leaders through hands-on creativity-enhancing exploration, consider making a charitable 3D printer donation
Without a doubt, right now is an exciting time for 3D printing in general. As the industry continues to move towards industrialization, this technology is increasingly becoming part of the broader manufacturing ecosystem. 3D printing is not just a current trend. It is, unarguably, a revolutionary technology that opens up endless possibilities world wide. From automotive to consumer goods, companies multiple industries are becoming aware of the great advantages 3D printing offers for production. The next steps for both the technology and the industry would be to maintain this momentum and continuously work towards enabling more applications on a larger scale. As you can imagine, this will create new and exciting jobs for those with the inclination for technology.
Introducing this innovative technology to the newer generation can create great opportunities and cultivate the skills needed to enter this new and exciting field.
Please read on find out how a 3D printer donation can benefit today's youth.
The Starting Line
3D printing works by beginning with a digital model in a 3D CAD (Computer-Aided Design) file and then creating a physical three-dimensional object. Objects are scanned — or an existing scan of an object is used, which is then processed by a piece of software known as a “slicer.” The slicer converts the model into a series of thin, 2-dimensional layers and produces a file with instructions (G-code) tailored to the specific type of 3D printer you are using.
For 3D printing’s use in education, it is a matter of bringing objects out of the computer screen and into the physical world — and into the hands of students for inspection, analysis, and other processes that benefit from physical manipulation.
3D Printing And Education
A lot has been said about the need for more education in the 3D printing industry. A lack of education is the biggest challenge faced by service bureaus today. The gap in need of expertise, in particular, can create barriers to entry into this new and exciting field of work. Without proper knowledgable individuals, companies will likely struggle to develop a business case or use 3D printing. Besides the future workforce, students are able to benefit from a 3D printer in the classroom setting as well.
Awareness around the capabilities of 3D printing is increasing gradually. A lot of emphases is being put into educating schools on how to get started with 3D printing and extract the most value out of it.
Here are a few examples of how schools and students can use a 3D printer to enrich their educational experience in the classroom setting:
History students can print out historical artifacts to examine for a hands-on learning experience
Graphic Design students would be able to print out 3D versions of their artwork
Geography students can print out various topography, demographic, or population maps
Chemistry students can print out 3D models of molecules giving them a different perspective on what they are learning.
Biology students can print out cells, viruses, organs, and other biological artifacts for an in-depth view of the body
Math students can print out 3D models of problems to then work on solving
These are a fraction of the many ways 3D printing technology can bridge the gap between the physical and the digital worlds — all you have to do is find what you need on the screen, then print it into existence. With the current costs of 3D printers becoming more and more affordable, they are not simply just another technological gadget for students to play around with but are becoming more and more important as an educational tool. They make both teaching and learning more effective all-around.
The 5 Major Benefits of 3D Printing in Education
From a future standpoint of growth and development, future designers, engineers, and artists will all have been students who have been impacted by 3D printing today.
5 major benefits of 3D printing’s impact on education…
Creating Excitement — 3D printing gives students the ability to experience their projects from the model stage to the actual creation of the model. This generates both excitement and a better understanding of the design process as they continuously gain hands-on experience from conception to creation. The intricate features are understood more clearly as the students build their projects layer by layer. Excitement grows from the ability to explore every detail in reality, not just on a computer screen or in a textbook. 3D printing also pulls the world of theory to the physical world where students can interact, see, and touch, opening up new possibilities like never before for learning and activities.
Complementing the Curriculum — No matter the curriculum being used, 3D printing can help students and teachers work together better. 3D printing upgrades students from being passive consumers of information on a computer screen with no thought given to productivity. Unlike with the conventional classroom model where students are easily bored, they are able to become more active and engaged participants through the conception, design, and execution of their projects and interaction with both the 3D printer and teacher.
Giving Access to Knowledge Previously Unavailable — Because most of the 3D printers on the market are pre-assembled and plug and play, it can be a fun cutting-edge technology for students to learn with. Students will learn that it’s acceptable to fail on the first try and then to try again in order to improve. Students will eventually come to understand that failure is simply a part of the process and they become less afraid to execute new and different ideas. This helps build a students’ confidence and teachers can enjoy the results of having self-motivated, self-confident students.
Opening New Possibilities for Learning — A 3D printer opens up unlimited learning possibilities for students. 3D printing will give students unique opportunities to experiment with ideas, to expand and grow their creativity. It can be hard to have young students figure things out without the benefit of visualization. Visual learning environments tend to improve a students understanding of the world. Being able to touch and see their projects in the real world can make a world of difference. 3D printers will open up new opportunities for presenting information in an economical and efficient manner.
Promoting problem-solving skills — As mentioned before, a 3D printer will give a variety of learning experiences. Students need to learn how different 3D printers work, how to efficiently operate them, and how to troubleshoot and solve problems. This is an art in which many students do not get to experience during their normal day to day studies. By learning how to troubleshoot and solve various 3D printer problems, students are able to learn how to practice persistence and endurance in overcoming difficulties. This can easily translate to helping students solve their own problems in life.
Developing a students’ creativity skill set can aid greatly in the development and passion for original thinking and creativity that can later be applied in business. 3D printing can promotes student achievements, while also preparing them for a college education. They develop a greater sence of confidence that allows them to pursue challenging courses such as those in the STEAM fields. As students explore and grow their imaginations, it cultivates an innovative mindset where students create their own unique 3D projects that is able to help train others as well as solve difficult problems.
The Bottom Line
Even though current prices on 3D printers are steadily lowering, not every school may be able to afford one. Not only does a good 3D printer have a sizable price tag but sometimes administration does not always agree on the need for such a forward-thinking piece of technology.
If you have a 3D printer at home that you don’t use as much as you thought you would, please consider a 3D printer donation to charities such as the Giving Center. Rather than leave it to collect dust and take up space, donate your 3D printer to a deserving charity.
Keep in mind, if you intend to collect a tax deduction, you will need to donate to a IRS accredited 501 ©(3) charity.
0 notes
Text
3D Printing Mega-Post (with links!)
Being a member of the maker community means I am surrounded by people who are totally in love with 3D printing. There’s no other group with whom I can have a 30 minute discussion about bed adhesion, lol. While the cosplay community is also generally supportive of the technique, every now and then I will come across somebody who thinks it is akin to cheating. Most recently it happened on a blog I really enjoy. When I read posts like that, I can only shake my head and assume that person must not really understand all the work that goes into 3D printing. Even in the best case scenario where you find a ready-to-print model and own a printer large enough to accommodate it, there is still tons of work that goes into taking a raw print from... well, a raw state to something beautiful. Hence I have decided to type up an overview of 3D printing; what it is, how it works, and all the steps it takes to create a cosplay prop. This is not a detailed tutorial; rather, it’s a high level scope of all the steps. Without further ado, here’s 3D Printing 101!
*12/20/17: Updated with new information on the latest printing technology plus even MORE links!
How does 3D printing work?
3D printing is an additive manufacturing process used to create three-dimensional objects; think of it as the opposite of sculpting where you start with a block of material and cut parts away (subtractive manufacturing). There are actually many types of 3D printing technology, but the most common for hobbyists by far is Fused Deposition Modeling—or FDM for short. In plain English, FDM means the printer head is essentially a hot glue gun that “draws” the cross-section of a model, building it up one thin layer at a time. After tens or hundreds of layers, ta-dah! You have a 3D object! You can check out this link for more info on other types of 3D printing.
The workflow for printing looks like this: find/make a 3D model, optimize that model for printing, convert it to G-code with a slicer, and send it to the printer. Once printing is complete, you need to assemble any separate parts, fill major gaps, fill/prime/sand the surface, and then paint. If any of those terms are confusing, don’t worry! I will explain them all.
Finding, Modifying, or Making a Model
Sourcing models is one of the topics where I see, “Cheater!” start to sneak in. There is a misconception that you can find just about any model you want, download, and hit print. This can be true depending on what you’re trying to build; popular cosplays like Iron Man, Halo, and Star Wars do have a plethora of models available for free, and many are already optimized for printing. Once you get outside well known characters, however, it gets much more challenging. If someone has 3D printed components in their cosplay, it’s never safe to assume the person just downloaded them.
Downloading Models
It’s always worth hunting around for the files you need even if the character isn’t well known. Even if you want to build everything from scratch, it is nice to see how someone else tackled the same challenge. There are a couple websites I like for searching for printable models:
Thingiverse: Run by Makerbot, Thingiverse is a huge collection of models designed specifically for 3D printing and all of them are free! This is where I always start my search for 3D printing files. Most come with some degree of instruction and suggested optimal print settings.
GrabCAD: I don’t use this site as frequently for costuming since the focus is engineering, but it’s very possible to find some cosplay goodies there. Other than scaling, most models should be ready to print.
SketchFab: While this was originally a place to share 3D models, some users also make theirs available. If you need a file for printing, be sure to search through the Downloadable section. (and even if you can't download the file, a 3D reference beats 2D refs any day!)
When selecting a model, try to find something that specifies it was made for 3D printing. Otherwise, you may need to do some manual cleanup and that can be challenging. Just FYI, game models are never ready to be printed but if you want to start with them, Source Film Maker has hundreds to select from. it’s also worth Googling to see if anyone has offered ripped models for free, but be aware that these should NOT be used for profit. Steriolythography (or .STL for short) and Wavefront (.OBJ) are the two most common file types, but get an STL if you can. OBJs will often come with texture files (.mtl), but those are not needed for printing. Aim for highest resolution you can find unless you want the low-poly look. Trust me, you don’t want to be filling in faceted planes with heaps of Bondo later.
There are a few products and processes that allow for multi color printing, but for the most part FDM machines are limited to one or two colors. If you are bound and determined to have multiple hues, you can check out Prusa’s new Multi-material upgrade, the new Da Vinci Color, or the Palatte Filament Splicer. I suspect that multi color printing is going to be one of the next major features to hit hobby printers, but for the time being most methods are either rudimentary or really expensive. It can also be fun to print with multiple materials such as combining rigid and flexible pieces, but that is best reserved for a dual extruding printer. When it comes to cosplay, I would either suggest printing in the object’s final color or preparing to paint. Even if you choose to paint, try and pick a filament color that will make sense if it is revealed through wear and tear.
Modifying Models
If something wasn’t specifically made for FDM, how do you know if it’s printable? Most commercial 3D modeling or CAD software have tools to check and correct issues with models—sometimes automatically. Unfortunately the easy-to-use, open source options in this area are a little barren but there are still ways to do it. Here are some free options for both checking and repairing mesh issues:
MakePrintable is an online paid service, but it will let you repair a set number of models per month for free. In my experience, this is best for basic issues but it couldn’t get any easier.
Microsoft STL Repair: Similar to MakePrintable, but unlimited and free. The downside is that you have zero control in the process, and files need to be opened with Microsoft’s free 3D Builder (from there you can export as an STL).
MeshMixer: An Autodesk product that has a number of capabilities for manipulating meshes. It’s more complex than MakePrintable and Microsoft 3D printing, but you have way more options.
Meshlab: Ah, Meshlab. This program has been around for a long time, and in many ways it is incredibly capable. Unfortunately, it’s also somewhat unstable and has bad documentation, so tutorials are hard to find.
Blender: A popular open source 3D modeling program, Blender also has a 3D printing add-on with some mesh analysis tools. This is the most robust option I have tried, but Blender has a steep learning curve and it can be intimidating for newbies.
Making Models
There is a good chance that you won’t be able to find ready-to-print files, so you might need to heavily mod or even make your own from scratch. Unfortunately, you will need to jump into 3D modeling software to make this happen. There are two major categories of software types: engineering (computer assisted drafting, or CAD for short) and artistic. In a nutshell, CAD is usually meant for objects (cars, wrenches, buildings, etc) and offers tight control over dimensions, surfaces, and shapes. Artistic software can be used for just about anything from trees to characters to spaceships, but it can be more challenging to make precise mechanical objects. I use both depending on what I need to create. There are actually a ton of free 3D modeling tools, so I will list the ones I have experience with and can recommend.
TinkerCAD: This is probably one of the most popular free CAD programs, and for good reason. It’s browser-based and very intuitive to use, thus it has become popular in schools. The entire thing revolves around building objects out of primitives, so if you need something complex it might take a little creativity to get there. TinkerCAD also has its own library of downloadable objects and it can export items for 3D printing (or even send them to a printing service!).
Google Sketchup: Available in both free and paid versions, SketchUp is a lot more complex than TinkerCAD but still very approachable. For some reason, it would drive my professors nuts when anyone used this software for homework. Be sure to check out the hefty list of extensions as they can significantly increase the program’s capabilities.
Autodesk Fusion 360: I will admit that I haven’t used this one very much, but it has been getting very popular very quickly. Fusion 360 is a fully-featured, professional CAD program meant for industry use, but it is available for free to students, startups, and hobbyists. If you want to grab the bull by the horns and work with maximum potential, get this software. It can be intimidating for someone who has never set foot in CAD before, but it is one of the most approachable fully featured CAD suites I have ever seen.
Sculptris: And now for something completely different! Sculptris is the baby brother of Z-brush, an industry standard software for digital sculpting. It’s actually very capable, and if you need to model something organic or CAD just isn’t making sense, give Sculptris a whirl.
MeshMixer: MeshMixer’s site calls itself, “a Swiss Army Knife for 3D meshes,” and that’s pretty accurate. It has some CAD capabilities mixed in with artistic tools and a few unique things to boot. It’s reasonably easy to use, although there could be more tutorial support in my opinion.
Blender: Ah, good ole’ Blender. Completely free now and forever (unlike many Autodesk programs), it’s the most capable and robust open source software I have ever used. Blender is definitely on the artistic side although it has add-ons that make CAD a little less painful. The major downside is the interface; simply put, Blender is incredibly unintuitive. Thankfully, Youtube has tons of high quality tutorials to get you started.
Slicing
Once you finally have a printable model in your possession, it’s time to send it to a 3D printer. If you are using a 3D printing service, congratulations! You can send them your model and call it a day. The rest of us will need to use a Slicer. Remember how the printer moves a hot glue gun around to draw a shape? Well, the computer needs to tell the printer head where to move, how fast to move there, and when to start and stop drawing. It uses a language called G-code to do this. A slicer’s job is to convert a 3D model into G-code so the printer knows what to do.
I use a free slicer called Cura from Ultimaker, but Slic3r and Repetier Host are popular options too (although more advanced). If you want ultimate control, cutting edge features, and don’t mind paying for it, Simplify 3D is considered the best slicer on the market. Cura is my slicer of choice due to its friendly interface. In the photo above, you can see how it has made layers out of a model (hence the name “slicer”).
The first thing to do will be properly scaling your print. Cura assumes your units are millimeters by default, so you may need to convert to your original modeling unit (inches, my my case). Unless you are printing a small prop or have a very large printer, your parts will probably be too big to fit on the print bed. If this is the case, return to your modeling software and split into smaller pieces.
When it comes to 3d printers, you get what you pay for. The more expensive models ($1500+) offer the closest thing you can get to plug-and-play experience, but even they will have failed prints, clogged extruders, and other common issues every now and then. The rest will need some degree of hand-holding. It took me about a week to get my $200 Monoprice Select Mini printing to the best of its ability, and that involved a lot of fiddling in Cura and 18 test prints. Spend some time optimizing your software for the fastest, highest quality prints; you’ll be grateful you did once you get to the sanding phase.
Update: After 10 months of regular, reliable performance, the board on my Monoprice Mini has died. At $160, I definitely got my money’s worth and other users have had theirs much longer. I am upgrading to a Prusa i3 MK3 kit, but I would still recommend the Select Mini v2 as a good gateway machine.
Printing
With your slicer ready to export G-Code, now is the time to set up your printer! A 3D printer’s “ink” is spools of plastic string called filament. There is a variety of plastics to choose from, but Polylactic Acid (PLA) and Acrylonitrile Butadiene Styrene (ABS) are the most common. PLA is cheap, readily available in many colors, and is made from plant starch. For most people, it’s the go-to choice but it is not the strongest material. ABS can provide better structural integrity, but it’s a little more finicky to print and the fumes are noxious and require ventilation. This link has a good summary on various types of filament on the market.
If you search Amazon or Google for 3D printing filament, you will get approximately 82376483456978938 results. Be sure that you are searching for the proper diameter filament; most printers are 1.75mm, but some are 2.85-3.0mm. Reliable brands of PLA that I have worked with are Hatchbox, Matterhackers, ProtoPasta, and ColorFabb. Be wary of no-name brands off places like Ebay or Amazon; not all filaments are created equally and I have definitely wasted money trying to be thrifty on Amazon.
With your filament loaded in the printer, it can be a good idea to extrude some and make sure everything is working properly. Next, verify you set the proper export settings in the slicing software. Different plastics need different speeds and temperatures, and often the packaging will give you a good suggestion. When all is ready, slice the model and send the G-code to your printer!
I always stick around to watch the first few layers of my print because most mistakes happen at that point. Bed adhesion in particular can be troublesome. My solution of choice for PLA is a layer of blue painter’s tape with a light misting of hair spray. Others have used glue sticks, but that didn’t work well for me. If you notice any problems, pause immediately and try to fix the issue. A small clog can turn into a major problem if plastic goops all over your extruder.
When the print is done, it can be tempting to pull the model off the bed but have a little patience! The plastic can warp while it is still warm, plus your printer will still be hot. Let it cool down slightly, then pop it off the bed.
Surfacing
Now comes the tedious part! First of all, remove any supports (or if you have a dual extruding printer, dissolve support filament) with pliers. Depending on the support type, a box knife or X-acto can be handy. I have also heard that deburring tools are handy for this. Next, assemble separate parts with glue. CA or epoxy are good choices, or you can get fancy with friction welding. If you printed with ABS, acetone can help glue pieces together and even smooth your model.
Next you will need to fill any major gaps such as those found along seams or where errors may have occurred in the print. Bondo Glazing and Spot Putty is a popular option for large holes and epoxy can be used as well. You can also use wood filler although I would reserve this for parts that will not be subject to a lot of handing or strain as it can be a little brittle.
Now you have to do something about all those layers.
Your options are sanding, smoothing, or a combination of the two. In the past I have wet sanded the plastic starting from 120, 220, and 400 grit wetdry sand paper. The “wet dry” part is important because PLA will heat quickly from friction and then you have to wait for it to cool again. If I wanted the plastic to show, then I would take it to 1000 grit or even a bit higher. 220 is the minimum for a matte appearance and slightly rough feel whereas 1000 starts to approach injection molded plastic. Bear in mind that dark filaments will show scratches and need sanding at finer grits to look clean. If you intend to paint, 400 grit paper is high enough. Then you will need to spray your model with primer. Allow to thoroughly dry (no longer cold to the touch) and sand with 600 or 800 grit paper. Reapply primer and continue sanding until you are satisfied with the surface. I have found 3 or 4 coats to be sufficient. Paint will hide very few defects, so you can’t take shortcuts with this step.
You can circumvent some obnoxious sanding by filling the layers first. Automotive filler primer works wonderfully although the fumes are terrible and it will need be to used in a well-ventilated area. Filler primer is much thicker than normal primer and with enough coats, it will fill in all those grooves. I found that 3-4 light coats built up a good base to start sanding, and then another 3 coats with sanding between each application gave an excellent finish. This might sound tedious (and it is, to be honest) but the primer sands much easier than PLA. I was satisfied with the finish 220 grit sandpaper provided.
I have heard that CA glue is also good for filling grooves, and Smooth-On makes a self-leveling product called XTC-3D that you paint over your model. I haven’t tried either of these, but they get good feedback from others. Finally, if you have printed in ABS you can try vapor smoothing your part; just be careful playing with acetone, and don’t do it too long or you’ll melt your piece.
Now with all that said, my experience with finishing 3D prints was with the intention of creating a production-quality model (aka something that looked like you bought brand new it from the store). Every print needed to be practically flawless when viewed at close range. For cosplay, this is unnecessary. Nobody is going to hyper-analyse your work from inches away; rather, you can rely on the 10 foot rule. Also, weathering will hide many defects
Focus your efforts on pieces that will show the most. For Soldier 76, this means I will be spending many hours making his mask smooth and pristine, but I’m not even going to paint the brackets on his boots.
Painting
Now you are on to the last step! Unless you wish to control texture through brush strokes, I always recommend spray painting or airbrushing. Rattle cans are available in a myriad of colors these days, but if you have an airbrush they are handy for detailed work. I had a professor who wouldn’t let a can of Rustoleum in his classroom and demanded we use Krylon, so I guess you should also use Krylon? The artists I know who use spray paint swear by the Montana brand, and they have a huge range of colors to select from.
Anyway, all your spray painting should be done outside or in an area with plenty of ventilation. I always wear a dust mask--not because I’m worried about paint fumes (dust masks don’t stop fumes anyway)--but because I don’t want to breath in teeny paint particles. Even if paint is non-toxic, it doesn’t belong in your lungs. I also like to tape down a huge backdrop so I don’t get any over-spray surprises. Your coats of paint should be incredibly light, almost like dusting the model with pigment. It will take many coats, but the slow buildup guarantees even application. I promise the effort is worth it, plus thin coats of paint dry quickly anyway.
Sealing
Last step! I have always used rattle can clear coats to seal my models. This step should not be skipped because your paint job can be marred very easily, but the sealer will help protect it. Always, always, always use the same brand of sealant as your paint or test on scraps first. I cannot reiterate this enough; not all products will get along together, and nothing ruins your week (or month) quite like destroying a detailed paint job. If your model will be going through a lot of wear and tear, you may consider coating it in clear resin for durability.
Conclusion
So as you can see, there is a LOT more work to 3D printing besides downloading and hitting print. I didn’t even go into detail and the post is huge. Any of these topics will have more information if you search on Youtube or Google, plus my Ask is always open. I hope this helps somebody!
71 notes
·
View notes
Text
7 Multi-Fold Reasons & Benefits Of Using A 3d Printer
Do you wish to enjoy a competitive edge over your competitors and make your mark in the industry? Then, you must invest in a high-quality 3d printer and along with that enjoy many more benefits.
1. The very first reason to use a 3 in 1 3d printer is that it speeds up your work progress. You can design, manufacture and test a particular customized part in the least amount of time possible. If the design has flaws, you can modify and reprint it without going through any hassles.
2. A benefit that you enjoy with 3d printers is the cost it saves you. When going through the traditional methods, you not only waste time but money too on getting something 3d printed and paying the high labor cost as well. But when you make use of the machine that you own, you save a lot of money and can get anything 3d printed as many times as you want.
3. Another major reason why large format 3d printer is getting popular is the fact that you can print anything that fits within its building format. All you will need to do is put the design information into the slicer software, add the needed supports and the print will start with little or no change at all to the overall machinery or equipment.

4. Those who make use of 3d printer enjoy a competitive advantage as they are not left dependent on someone else. As soon as they design a product, they can get it 3d printed in a reduced amount of time and also without exposing the new design to unknown people. This way a product can further be improved and enhanced so that it can be delivered before competitors do.
5. When you see a product on the screen, you cannot compare it with something that can be actually felt in hands. Cnc router laser 3d printer lets you create a physical prototype so that its flaws can be found, modified and a new version can be printed at the earliest.
6. When making use of traditional methods, you cannot be sure about the quality of the prototype printed by certain printers. When you will get a 3d printer from 3d printer resellers, you will know the kind of technology you are investing in. This way you can control the quality of the prototype you want to print.
7. Once a prototype is printed, you can go through each and every minor detail to understand it better. This way you can be sure of its quality and functionality. After making sure these aspects, you can move ahead with the bulk manufacturing process.
Source Url: https://sites.google.com/view/3-in-1-3d-printer/home
For More Information: Hybrid 3D Printer CNC
CNC 3D Printer for Sale
3D Printer CNC Laser Cutter
0 notes
Text
The Ultimate DIY: Use a 3D Printer to Make These 10 Household Items
kynny/iStock
Gadget geeks have been all over them in the last few years, but 3D printers still aren’t as common in people’s homes as the ink-and-paper ones yet—despite their usefulness to homeowners. But this may be changing.
While an inkjet printer just sprays ink onto flat sheets of paper to create letters and images, a 3D printer sprays plastic or some other substance that will hold its shape in a given pattern. It’s basically your own mini custom factory.
“The killer app for personal 3D printers is the making of household replacement parts— cheaply, quickly and immediately,” says Daniel Levine, the director of the Avant-Guide Institute, which tracks consumer trends around the world, and the publisher of Wikitrend.org.
It’s not that easy for a newbie to design a product for a 3D printer, though.
“It takes time and effort to learn how to do 3D modeling; it’s not as simple as just pressing ‘Print’ on your computer screen,” Levine says.
And yet, if you’re a “maker” or DIY enthusiast, the process might be its own reward. And these cool projects—the patterns are free, although you’ll need to buy the supplies—can help get you started. Go for it!
1. Self-watering planter
You can’t print your own plant just yet.
cults3d.com
Yup, that’s right—a 3D printed planter that waters itself, yet doesn’t leak. The secret is in two slow-printed waterproof shells. (Parallel Goods, cults3d.com)
2. Makeup organizer
The Kardashians need a 3D printer.
cults3d.com
Kaboodles are so last century. This 11 centimeter-by-22 centimeter makeup organizer will hold all your contouring supplies, brow gel, and then some. (Cerega,cults3d.com)
3. Rechargeable lantern
A shining example of what 3D printers can do.
cults3d.com
This lantern takes some additional skills to construct. For instance, after printing the pieces and putting them together, you’ll need to solder on a USB port. But once it has all come together, charging this lantern via USB for just 10 seconds will provide about 10 minutes of LED light. (Blecheimer, cults3d.com)
4. Sound amplifier
Build this groove monster in just a few hours.
cults3d.com
Although it’s just one simple part, don’t call this “Groovi Monster” amplifier for your smartphone basic. (3Dshook, cults3d.com)
5. Desk-supplies caddy
You knew it was going to be on this list somewhere, didn’t you?
cults3d.com
If you’re a newbie to 3D printing, think about starting with this easy design: a small box that holds your pencils, office supplies, flash drives, and SIM cards, in case you have a bunch of those lying around. (Monkey3D/cults3d.com)
6. Coasters
Because flat surfaces always need to be protected from liquids
thingiverse.com
Your first- and second-graders are going to have some serious competition for their art projects. Macaroni necklaces and turkey hands ain’t got nothing on 3D printed coasters. They’re customizable, too. Just configure the pattern you want, using the infill settings of your slicer. Don’t understand what that means? Oh, you will. (jmdbcool/thingiverse.com)
7. Soap holder
“Oh, this old thing? I 3D printed it myself.”
thingiverse.com
Kiddos heading off to college? Forget the massive shopping spree ritual at Bed, Bath and Beyond. Instead, have them 3D print everything they need, starting with this simple soap holder. They can choose their own color. (piuLAB, thingiverse.com)
8. Safety box cutter
Cut! That’s perfect.
Thingiverse.com
Seriously, how cool is a 3D-printed box cutter? And if you’re worried it won’t be efficient enough to open your boxes from Amazon, you can use cutting pliers to sharpen the V-groove. Bonus: The words “Box Cutter 3D” on the handle are a great conversation starter. (Fantastic Fox, thingiverse.com)
9. Deadbolt combination lock
Get (code) crackin’.
cults3d.com
Not only does it look good, but this lock offers 17,576 unlock combos. Besides your 3D printer, you’ll need wood screws, socket cap bolts, SuperGlue, and slurry to weld the printed parts together, but a short video walks you through the process. (DuaneIndeed, cults3d.com)
10. Tweety egg separator
This is not a yolk.
thingiverse.com
This kitchen tool, which separates an egg white from the yolk, is the 3D-printed item you never knew you needed. The basic model is nothing fancy, but if you’re new to this whole 3D printing thing, it’s probably eggs-actly the project you need. (mussy, thingiverse.com)
The post The Ultimate DIY: Use a 3D Printer to Make These 10 Household Items appeared first on Real Estate News & Insights | realtor.com®.
0 notes